Output Settings - 3.2.0.0
- Administrator (Unlicensed)
- Berna Radoncic
- Ayça Vural (Unlicensed)
- Umral Serbest (Unlicensed)
Output Settings is used to adjust File Name / Folder Path to encode and other settings for encoded files. Output Settings tab is shown below.

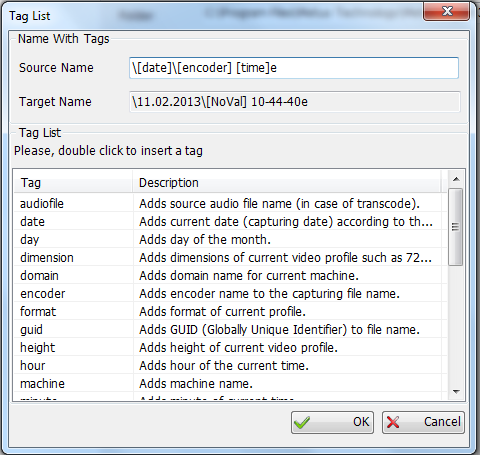
Filename: It represents the name of the encoding file. Different naming formats can be defined for each recording profiles by clicking Tags button and choosing tags .The created files can be named by the date and time, recording computer, user name, encoder name, guid, and other variables. Please click the Tags button to see the list of possible tags.
Note: Using “\” char in Filename or Folder textbox will create a folder. Put a “\” sign at the end of the each naming criteria which you want to create a folder. You can add new criteria by clicking the Tags button in the appearing window.
For example; “[date]\[time]” expression in Filename textbox will create a folder with current date and a file name with current time during the encoding such as “11.10.2010\16-23-32.mpg”
If you add a “\” to the path, Metus Ingest will create a new folder. For example ; “[year]\[month]\[day]\[date]-[time]-HD” will make output : “…\2011\1\12\12.01.2011-11-48-38-HD.mpg”
Note: File name can be changed while the encoding is running. It’s not a necessity to input the file name before starting the capture. To enable this, from “Application Settings” window in “General” tab, “Rename current file if naming format changes” option must be checked.
Folder : Folder path is where encoding files will be saved.
Note: If the sequential disk filling is enabled then these folder settings will be ignored and the settings in disk filling will be used.
Use safe copy : This option is for encoding to a network path in a safe way such that Ingest will encode to a local temporary folder. After that each time the specific size of recorded file will be copied to this file from this temporary folder to the network path that is written. Therefore, somehow if network goes off for some time (before the encoding is finished) Ingest will continue working and recording to the temp file. When network comes back, ingest will transfer rest of the file that is recorded. When ingest stops and temp file copied to the network destination, this temp file will be deleted.
Part size: This option indicates size of file which will be copied to local machine before it is copied to network.
Note: You should define a temp file directory (folder) from Tools > Options > Safe Network Recording.
Don’t delete created file anyway: This option is used for garbage collection not to delete these files even if they conform to the rules of garbage collection.
Create video index for created file: This option is used for creating indexes of video files. This video index is used in Metus MAM for image (frame) matching function. In Metus MAM user can select an image and search for similar frames within any archived videos.
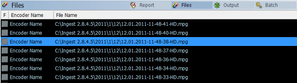
If a specified file with given tags are exist in target folder than user can choose between three options;

- Append a number to the file name: option will append number such as “…0001.mpg” to the end of file name.
- Overwrite the existing file: option will overwrite the file.
- Do not start the profile: option will stop capturing for current profile.
Adjust date/time tags: According to this option date/time related tags can be adjust. For example, + 02:00:00 adjust time tags two hours forward. For example, if local machine’s time is 16:47:55 it will write as 18:47:55. Another example for when date and time tags used together is like the following ; for - 22:00:00 when date and time is 27.01.2011 14:03:45 it will result in 22 hours backward. It will come out as 26.01.2011 16:03:45
Auto Split Settings
Auto split settings selections are shown below.
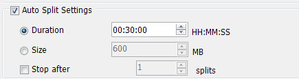
- File splitting by record time ( Duration )
1. Click Profiles on the desired Encoder.
2. In this screen select the recorded format that will be splitted, then click Output panel.
3. Check the Auto Split Settings option and click Duration.
4. Enter the value in hours, minutes and seconds.
It will start to record to a new file when the duration value that you entered is over.
- File splitting by record size ( Size )
1. Click Profiles on the desired Encoder.
2. In this screen select the recorded format that will be splitted, then click Output panel.
3. Check the Auto Split Settings option and click File Size.
4. Enter the value in MB.
- Stop after
1. Click Profiles on the desired Encoder.
2. In this screen select the recorded format that will be splitted, then click Output panel.
3. Check the Auto Split Settings option and click Stop after section . Choose count of split to stop encoding.
Note: There is a known issue for auto split settings according to file size for F4v ( Flash Video 4 ) file format. Therefore , if F4v file format will be captured then duration option should be selected; file size option should not be selected.
Custom Actions Settings
Before using this settings , you should set Custom Actions from Tools > Options > Actions to use this setting. Click HERE for Actions Settings.
- Check Run ,
- Choose one of Custom Actions which you set from Tools > Options > Actions before.

