Encoder Source - 3.2.0.0
- Administrator (Unlicensed)
- Berna Radoncic
- Ayça Vural (Unlicensed)
- Umral Serbest (Unlicensed)
Supported Encoder Sources :
To see supported encoder sources click Supported Inputs - 3.2.0.0 .
Adding Video & Audio Sources to an Encoder
Only a singe video and a single audio source can be configured for an encoder. Whichever way used to add an encoder, the same window pops up. By the help of this window a video and audio source can be added.

Adding Video Source
Encoder Name can be entered in the bottom left. After that by clicking  button a video source window pops up it is shown below.

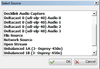
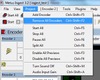
By choosing one of the sources and clicking OK button, a video source will be added to this encoder. If “File Source” is selected as video source , a folder browser window pops up. Any video file from local machine or network can be selected.
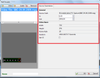
After adding any video source, all source information and parameters can be examined in “Source Parameter” tab. These information types and values vary according to selected video source . As an example The "Source Parameter" tab at the image is for "File Source".
Adding Audio Source
By clicking  button, an audio source can be added. It’s almost the same process with adding a video source.
Simply, by selecting any audio source and clicking OK an audio source can be added. Just like adding video source, if File Source is selected as audio source , a folder browser pops up and any audio source file can be selected here.

After adding any audio source, as in video source, all source information and parameters can be examined. Also these information types and values change according to selected audio source. As an example The "Source Parameter" tab at the image is for "File Source".
Note: If a video source is selected , before selecting an audio source, variety of source files which will be added must be limited. For example, if “Decklink Video Capture” is selected as a video source, only “Decklink Audio Capture” can be added as an audio source. This situation is also true for vice versa. For example, if “Decklink Audio Capture” is selected as an audio source, only “Decklink Video Capture” can be added as a video source.
Note: It’s not necessary to add both video and audio sources at the same time for an encoder. If it’s required, only a video source or only an audio source can be added to an encoder.
Edit Source
If any source is added, this source can be edit anytime except at the time of encoding. (While encoding, "Edit Source" window cannot be opened.) Video and/or audio settings can be adjusted or one of them can be removed. (Both video and audio source cannot be removed while editing, at least one of them must exist.)
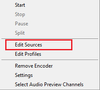
Opening Edit Source Menu with different ways :
From Toolbar Menu

From Encoder Menu

- From Right Click Menu
Remove a Source
 By using this button, the source which is selected can be removed.
Adding Blackmagic Decklink Card As Encoder
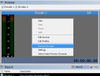
Unlike other sources, Blackmagic Decklink boards have two options while adding them as an encoder. Direct Show (DS) is one of them which is same with other cards. Low Level (LL) is other option and this is a bit different from other cards. When a video source is added as an encoder with LL option, audio will be in this video source too, so an audio source can not be added separately.
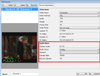
As it seen at the picture , audio and video are both seen as one source. Capture audio should be checked if audio of the source is desired to be ingested also. Audio input should be selected as “Embedded” if the source is connected as SDI. Channel amount is two and can be changed if source channel amount is different.
Removing an Encoder
An encoder cannot be removed while source is encoding. There are several ways to remove an encoder.
From Toolbar Menu

From the Project Menu : “Remove All Encoders” can be used too but this will remove not only the encoder that is active, but also all other encoders as well.
From the Encoder Menu

From Right Click Menu :
With Hotkey Another easy way to add a new encoder is using hotkey CTRL+SHIFT+F2.
Encoder Entities
There are meanings of symbol at the "Encoders " view at the Left Panel after adding sources and profiles.
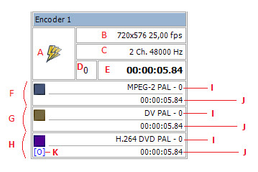
A. Capture Mode
B. Source video size and frame rate
C. Source audio channels and Sample rate
D. Source buffer
E. Capture time (duration)
F. Profile 1
G. Profile 2
H. Profile 3
I. Samples buffer, sample count for profiles. This is the sample count on queue waiting for encoding. If this number increases then it means the system is not adequate for encoding in this profile.
J. Capture time (duration) of profiles.
K. [O] icon: Burned-in video overlay enabled on current profile

