Batch Capture Mode - 3.2.0.0
- Administrator (Unlicensed)
- Berna Radoncic
- Ayça Vural (Unlicensed)
- Umral Serbest (Unlicensed)
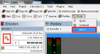
Batch: You need to set recording mode to Batch option if you want to enable batch recording option from VTR, DVCAM, etc. devices. It is shown below choosing Batch Capture Mode and its appearance on the Left Panel after choosing Batch Capture Mode .
Batch Capture from VTR, DVCAM
Metus Ingest can record from the tape recorders and VTRs which can be controlled via RS422 interface using the batch capture feature.
Capturing with Batch Capture
1. Attach the tape source to your computer via RS422 port.
2. Run Metus Ingest, add an encoder and select the source.

3. Select the profile(s) you wish to add from Profiles Window.

4. Change Mode to Batch.

5. Click to Batch window to set the parameters for batch recording.

6. On the display shown on the left corner of the figure above, no device (VTR) has yet connected to the Ingest, so the user should check com port settings from Computer Management => Device Manager=> Ports. On the figure shown below, a Declink card has been connected to COM3 (Blackmagic RS422 Serial Port).

Therefore the user should change Port setting to COM3 by clicking to Settings button (  )
)
After the user changes com port from Settings , the name of the VTR (PVW2600) connected to COM3 appears on the batch display.
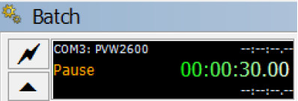
7. Click Play button to watch the source.
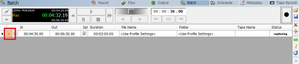
8. By clicking to “ ” button, the user sets In and Out points, File Name, Folder and Tape Name during play out. The startup values just after clicking to “ ” button are shown on the figure below.
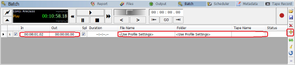
On the figure shown below, In and Out points are set by the user, so the time difference. Duration, is automatically set. If the user leaves File Name and Folder as <Use Profile Settings>, then the values are automatically retrieved from the Output tab of the Profile window. The user can optionally set the name of the tape.
9. The user can start to record by clicking the big red dot on the right corner of the Batch window. During recording, the record button turns from red to black and Status is in capturing mode.
Batch Window
This window is at the bottom panel.
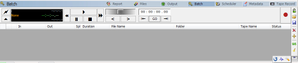
Batch buttons are described as below;
 Lock
Lock
 Enabling / Disabling
 Import : It imports the saved list to the Progress List.
 Export: It exports the list as text file.
 Add
Add
 Remove
 Sort
Sort
![]() Clean
Clean
 Reset: clears Status in the List.
 Ping: refreshes the connection between VTR and the computer.
Settings: it sets the connection parameters between VTR and the computer.
Capture: ![]() starts recording after adding scheduled task(s) with an In and Out point to the Progress List.
starts recording after adding scheduled task(s) with an In and Out point to the Progress List.
Eject: ![]() ejects the cassette in the tape source.
ejects the cassette in the tape source.
Play / Pause:  starts to play the cassette or
  pauses the cassette.
Stop:  stops all actions like playing, rewinding, forwarding, capturing.
FF: ![]() forwards the media
forwards the media
Rewind: ![]() rewinds the media
rewinds the media
Next Frame: ![]() forwards the media 1 frame.
forwards the media 1 frame.
Previous Frame: ![]() rewinds the media 1 frame.
rewinds the media 1 frame.
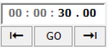
Go:  rewinds or forwards the media to any time indicated on the time indicator, which is just above
GO ![]() button on the Batch window.
button on the Batch window.
Mark In: ![]() inserts the playout time to In point in the Progress List.
inserts the playout time to In point in the Progress List.
Mark Out: ![]() inserts the playout time to Out point in the Progress List.
inserts the playout time to Out point in the Progress List.
Standby: ![]()
![]() switches VTR between STANDBY ON and STANDBY OFF modes when VTR is in STOP mode. In STANDBY ON mode, the head drum is rotating and the tape keeps wound on the drum under tension. In STANDBY OFF mode, the tape is released from tension going out of contact with the head drum, which is now stopped from rotating. The purpose of this mode is protect the tape from fatigue and wear.
switches VTR between STANDBY ON and STANDBY OFF modes when VTR is in STOP mode. In STANDBY ON mode, the head drum is rotating and the tape keeps wound on the drum under tension. In STANDBY OFF mode, the tape is released from tension going out of contact with the head drum, which is now stopped from rotating. The purpose of this mode is protect the tape from fatigue and wear.
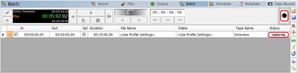
On the figure shown above, the area colored with orange shows the status of the recording. The status and the colors of the area are;
- complete >> green
- positioning >> yellow
- capturing >> orange
- aborted >> red
For the recording to be done, the checkbox must be checked.
In is the start time of the recording,
Out is the end time of the recording,
Spl; if the user wants to split recording, he puts a check to this checkbox.

On the figure above, with the result of the first split, one file will be created from record1 and record2 and with the result of the second split, the other file will be created from record3 and record respectively
Note: If the user enables splitting from Profiles by checking Record Limitation from Profiles, Output tab on the Ingest, then there is no effect of splitting from Batch window.
File Name is the name of the file with the result of the recording.
Folder is the folder name of the resulted file.
Tape Name (optional) is the name of the source.
Status is the phase of the recording.
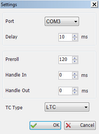
Settings
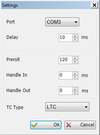
Port: should be set to any serial port (COM1 or COM3) to connect VTR to the computer that Ingest application runs.
Preroll: the recording starts as early as the value entered in this field. This frame must be maximum 250 frames (10 sec.).
Delay: the frequency (in ms) of the port scanning between VTR and the computer.
Handle In: the recording starts as early as the value entered in this field.
Handle Out: the recording stops as later as the value entred in this field.
TC Type
If the user doesn’t want to lose a frame from the beginning or at the end of the record, Handle In and Handle Out values must be set from the Settings window. The value in Handle In field defines the frame value that how early the recording will start. The value in Handle Out field defines the frame value that how later the recording will stop.
The Format of the Saved List
The format of the imported list is shown below, (;) character should be put among the parameters in the list.

The minimum number of the parameters are shown on the figure below, In and Out parameters should be defined and (;) character should be inserted for the null parameters.
Note: If this text file will be used as an imported list, Stop button on the menu should be clicked at the end of the recording. The recording source will be automatically saved to the default folder defined on the Default Output settings.


